You pull the vocal stem and it sounds like someone ran it through a bathroom fan. Artifacts on every sibilant. Drums bleeding into the low mids. Reverb tail smeared across the entire track.
The ai splitter you chose made your cleanup job harder than the original project. Here is how to avoid that next time.
What Most Splitters Get Wrong?
Most stem separation tools were built around a two-stem model: vocals and everything else. That worked well enough when producers just needed to check a melody. It does not work when you are building a remix, sampling for a beat, or trying to isolate a lead vocal for a live performance.
The second problem is artifact tolerance. Many tools treat minor bleed and spectral smearing as acceptable collateral damage. For a casual listener, they might be right. For a producer working at 24-bit, those artifacts land in your final mix and you spend hours chasing ghosts.
The third problem is reverb. If the source track has room or plate on the vocal, a naive separator pulls it all. Now you have an isolated voice sitting in a ghost reverb that does not match your project. You cannot remove it cleanly after the fact.
A two-stem split in 2025 is not stem separation. It is a blunt instrument wearing a modern interface.
What Does a Good AI Splitter Actually Do?
The tools worth using share specific capabilities. Use this as a checklist before committing to anything in your workflow.
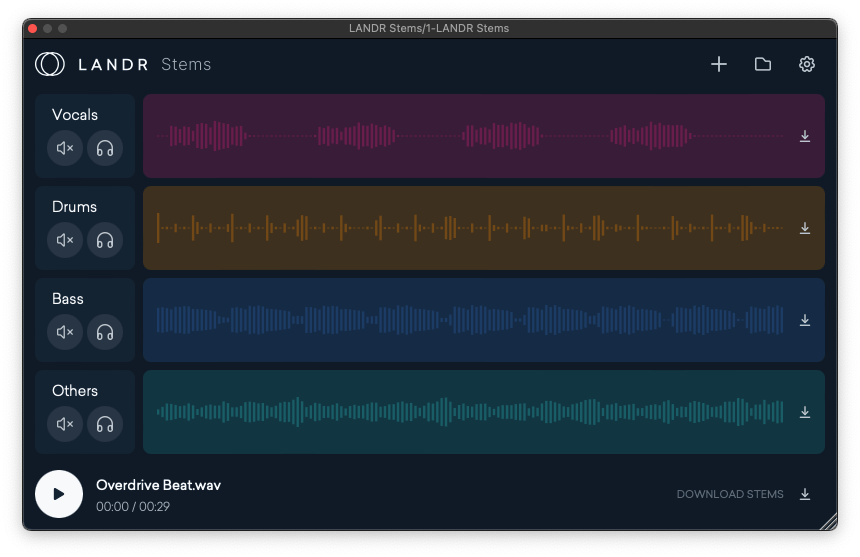
Multi-Stem Separation
Two stems — vocals and instrumentals — is the floor, not the ceiling. You need separation into at least four distinct layers: lead vocals, drums, bass, and harmonic content. Background layers (reverb tails, pads, room sound) should be separable too. The more surgical your splits, the more options you have downstream.
Vocal Cleanup and De-Reverb
A good ai splitter gives you a vocal cleanup pass as a separate option. This removes residual reverb and backing vocal bleed after the initial split. Without it, you are left with a vocal that still carries the sound signature of the original room — which rarely works in a new project.
Processing Speed
If a tool takes three minutes to process a four-minute track, you will not use it in a fast-moving session. Fast processing — under ten seconds for a typical track — keeps you in flow. Waiting breaks focus and adds friction to every iteration.
Format Flexibility
Your source files are not always the same format. MP3 masters from old projects, WAV stems from a collaborator, FLAC files from a client delivery — a capable tool handles them all without a conversion step. Format friction is a small annoyance that compounds quickly across a session.
Unlimited Processing for Paid Tiers
Per-track limits or credit systems punish the way producers actually work. You run a track through once to preview. You run it again with different settings. You split three versions to compare. Tools with unlimited processing for paid users stop charging you for iteration.
How do you apply these tips in practice?
Start with the highest quality source file you can find. Separation quality degrades with compressed audio. An MP3 at 128kbps will give you worse results than the same song at 320kbps or lossless. Always source the best file available.
Use the cleanup pass on every vocal, even clean-sounding ones. You will not always hear the reverb bleed in isolation. It shows up when you drop the stem into a new reverb or a dry room. Run cleanup first, then decide what to add back.
Split stems before you sample, not after. If you are building a beat from a sample, extract the bass and drums before you chop. You get cleaner slices and fewer phase issues when you layer them in your DAW.
Use a stem extractor that separates background layers separately. Background layers contain the room, the air, and the incidental sounds that make a recording feel real. Keeping them isolated lets you reintroduce them selectively, or use them as texture in a new context. A stem extractor that bundles everything except the lead vocal into one file is leaving production options on the table.
Reference your stems against the original immediately after splitting. Play the isolated vocal against the original mix for ten seconds. If you hear significant frequency loss or new artifacts, that is your baseline to work against. Document what you hear before you start cleaning.
Frequently Asked Questions
Why do most two-stem AI splitters fail for production-level vocal isolation?
Most stem separation tools were built around a two-stem model — vocals and everything else — which worked for checking a melody but doesn’t work when you’re building a remix, sampling for a beat, or isolating a lead vocal for live performance. The second problem is artifact tolerance: many tools treat minor bleed and spectral smearing as acceptable collateral damage, but at 24-bit those artifacts land in your final mix and you spend hours chasing ghosts. The third problem is reverb — if the source track has room or plate on the vocal, a naive separator pulls it all, leaving an isolated voice sitting in a ghost reverb that doesn’t match your project and can’t be removed cleanly after the fact.
What capabilities does a professional AI splitter need to deliver clean vocal stems?
You need separation into at least four distinct layers — lead vocals, drums, bass, and harmonic content — with background layers separable too for the most surgical options downstream. A vocal cleanup pass as a separate option removes residual reverb and backing vocal bleed after the initial split; without it, the vocal still carries the sound signature of the original room. Fast processing under ten seconds for a typical track keeps the tool in your workflow instead of becoming a bottleneck, and unlimited processing for paid users stops charging you for the iteration that is how producers actually work: previewing once, running again with different settings, splitting three versions to compare.
How should you apply AI vocal cleanup and stem separation in a production workflow?
Start with the highest quality source file available — a 320kbps or lossless file gives better separation than an MP3 at 128kbps. Run the cleanup pass on every vocal even when it sounds clean in isolation, since reverb bleed that isn’t audible in isolation shows up when you drop the stem into a new reverb or a dry room. Split stems before you sample rather than after: extract bass and drums before chopping to get cleaner slices with fewer phase issues when layering in your DAW. Reference your stems against the original mix immediately after splitting — play the isolated vocal against the original for ten seconds to document what you hear before starting cleanup.
Competitive Pressure Close
Producers who can pull clean stems fast are delivering cleaner remixes, better sample packs, and more accurate vocal isolation than their competitors. The gap is not skill. It is tooling.
Two-stem splitters are still the default for most producers because they were the first tools available. That default is now a ceiling. The producers moving past it are using multi-stem separation with cleanup options, and they are doing it in seconds per track, not minutes.
Every session where you compromise on stem quality is a session where you spend extra time compensating. That time adds up. The tools that eliminate it are available now.